Saturday, November 28, 2020

Advent Activity Bag

 Let The Counting Begin

Each day attach a cotton ball to the sheep. Glue stick and cotton balls are included in the activity bag.

Click on the image to download and print.

Learn the Christmas Story With Scripture Cards


https://happyhomefairy.com/bible-verse-advent-countdown-kids-free-printable/?fbclid=IwAR3F61kUHNq6pY76xw0HAYq-iILvNzHCTwDP2Hjo_i0jpNI_kklZzV3FZcg

Click on the link to print these cutie mini scripture cards. Cut them out and read the scripture for the day. 

For fun place the cards in the shape of a Christmas tree like the one pictured below.


Nativity Character Cards

Nativity Figures

Print these fun nativity figures for ornaments to put on the tree. Print on card stock for durability.


Wednesday, November 11, 2020

Faith In the Family Gratitude Stone Project


Give Thanks With A Grateful Heart!

                 
The heart is the universal symbol for love. This project is all about sharing love and kindness and living a life of gratitude.
 Kiddos decorate the rocks and paint sealer on them for protection from the weather . When dry, the stones can be placed in the canvas pouch for safe keeping. 
When out and about, the pouch can be taken along and when families see a place to leave a stone where someone else might find it ...simply leave it, together say a prayer that who ever finds the stone will be blessed , feel joy and be reminded of the good in the world. Perhaps they may keep it or maybe  they will leave it for someone else to find.

Kits


Everything that is needed to get families started with the project is placed in a take home kit. A gallon size plastic bag worked well. Directions with all of the how to's and suggestions of ways to share the stones are included. Each child in the family receives a kit.
Most of the supplies I ordered from Amazon in bulk. Extras will be used for other projects.

Supplies In the Kits

Stones

I ordered 2-3 inch flat rocks . Each kit contains 3 rocks .
Families can find or purchase additional rocks for the project.


Pouches

I purchased these canvas draw string pouches from Michaels for 5.99 @8 and got the second set 50% off.  The pouches are the perfect size for 3 stones. You can find them in the jewelry dept.

Sealer

I purchased 2 oz plastic bottles on Amazon to share Mod Podge glue for making the stones weather proof. 1 bottle of Mod Podge is included in each kit.


Sponge Paint Brushes

1 brush for each kit.


Red Sharpie Marker and Heart Stickers

On one side of the stone a large red heart can be drawn and colored.


Mini heart stickers can be placed on the other side of the stone.


Families are to keep 1 stone in their home to remind them to share love with acts of kindness just as Jesus did. 

 This story by Mercer Mayer shares how Little Critter learns a valuable lesson of thankfulness from his Grandpa and a little stone. "Gratitude is being thankful for everything in your life," said Grandpa " Sometimes when I forget , I look at my thankful rock and I praise God for His goodness and for all things I'm thankful for- like you, Little Critter!"
This book is not part of the kit. It can be purchased on Amazon as well.See the link below. I will be reading it online to all of our worship at home families as I share the project with them. 


Send me a Buzzzz.
allthingschildrensministry@gmail.com


Tuesday, October 27, 2020


Give Thanks With A Grateful Heart

Gratitude Journal


In this post you will have the process and all of the printables to complete a gratitude journal for first - fourth graders.

It takes some time to print, cut out and assemble . This project would be a great way to get parent volunteers involved.  Students can create the cover and even glue the writing   prompts, scripture cards, coloring pages, activity pages and assemble the journal themselves.

This is a great project to begin at school and send home for the Thanksgiving Holiday with the focus on giving thanks and growing an additude of graditude.

Cereal Box

Cut the top and bottom from the cereal box and one side panel. This leaves the front, back and side. 

3 Ring Binder 


For this journal a 9x7 3 ring binder works well. I found this one at the Dollar General.

Adding the cereal box cover to the binder.


Use a strong adhesive such as E 600 glue and reinforce the sides with clear packing tape. 


Before gluing wrap the cereal box around the binder
  matching up the spine of  the binder to the box and 
cut off the excess cereal box from the bottom and sides.


Let the cover dry overnight.

Supplies used for assembly.


When complete , the journal will contain 23 pages. 
I used colored card stock folded and cut in half to create the pages.

In addition you will need:
* Glue Stick
* Paper Cutter or Scissors
* Hole Punch
* Cover Page Printable
* Give Thanks With A Grateful Heart Printable
* Daily Gratitude Prompt Cards
* Polaroid Picture Cards
* Scripture Cards
*Coloring Pages
* Activity Pages

Pages


Pages 1-2 For coloring and adding a self portrait inside the Polaroid picture frame.

   
       Gratitude response prompts for 30 days. Inside each polaroid frame, students can create a heart to connect with the theme of the journal, " Give thanks with a grateful heart." The heart can be drawn, or cut out of paper or heart stickers placed inside the frame. 


Scripture cards for connecting the theme with specific verses.


Coloring page and Scripture activity page.


   Activity page and reflection page. Have students write their own name inside the cross, with the statement  > Gives Thanks.


Links and Printables


jpeg Printables

I designed the doodle graphics to print 5x7. The Polaroid doodle frame page will print on 8 1/2 x 11 size paper. Right click on the image to download. Trim the top and bottom to fit on the card stock.
You will need to print 8 pages ( 32 frames) of the Polaroid doodle picture frame


Saturday, August 29, 2020

Cover It Up!

COVER IT UP!

Cover up any book, journal or planner with cloth, paper or a 
Dollar Store bandana.
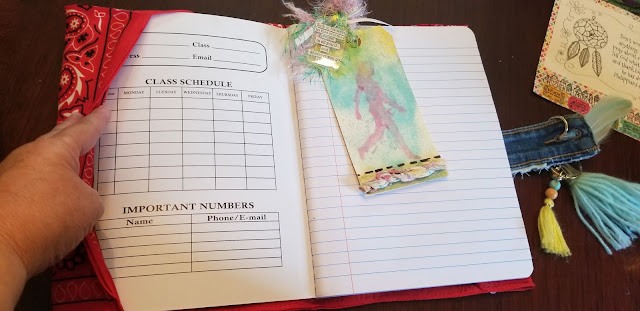
For this project I used one bandana, the pocket and part of the waist band from a pair of jeans, a glue gun and a sharp pair of scissors to cover a wide ruled student journal for my 10 year old Grand Daughter.
The great thing is that when she runs out of room in her journal and is ready for another one, the cover can be used over and over. 
We might even iron on some patches and perhaps I can teach her how to stitch on it.


Here is a view of the back. No cutting involved or measuring.


Fold the bandana in half and hot glue the two finished long edges together. This will give you the bottom and the top of the cover.


Place the journal in the middle of the bandana. Open up the journal cover and fold over the bandana to create a pocket for the cover to slide into. Hot glue the corners .


The journal covers will fit snug inside of the pockets.


Cut the pocket from a pair of jeans.


I cut the Levi Strauss & Co. tag from the waist band.


And hot glued the tag to the pocket.


The waist band is cut into 2 pieces to form a closure for the cover with the button on one side and the button hole on the other. Both sides are glued to the back side of the pocket.


The pocket is placed in the middle of the bandana cover and hot glued. Only glue the pocket. You want the closures to be left unglued.


The pocket stays in place while the straps are free to be buttoned and un buttoned.


When closed there is enough room for expansion as things are placed in the journal.


I included a beautiful tag bookmark created by Visual Faith Ministry Webmaster Diane Marra.  At out last Visual Faith Ministry conference Diane sent dozens of beautiful tags as gifts to all who attended. This is one that I chose. I love the verse that she paired with this tag. 


I am tucking one of my Scripture Doodles in the cover of the journal. This scripture pairs well with the history of the dream catcher. 


The back of the Scripture Doodle with some fun facts about Dream Catchers and the inspiration in creating the Scripture doodle.


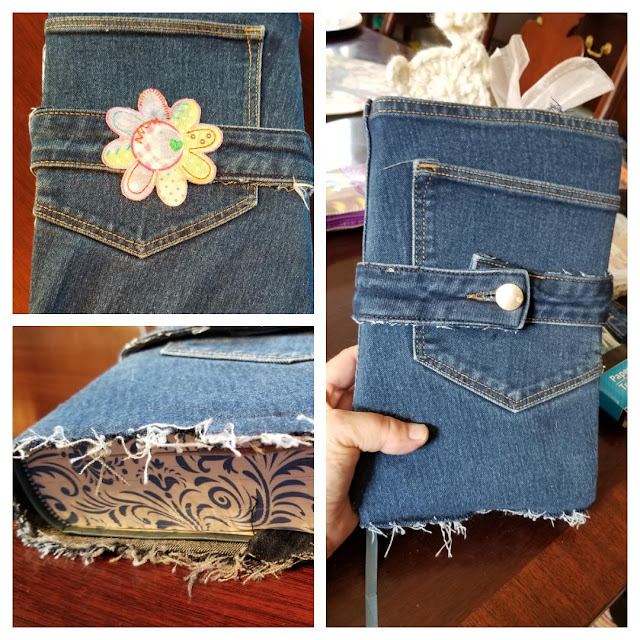
I covered the Enduring Word Bible with a pair of jeans using a similar process. I fringed the bottom edge for a vintage 60's-70's look.


I cut the waist band off to create a closure and cut the length of the jeans to cover the length of the Bible. Fold over the sides to create pockets for the covers. Glued the corners with hot glue.


The band gives room for expansion. 


She is "Double Digits" now....


....and lives 12 hours away. I can share from my heart and hands, a faith walk that she can be reminded of each time she opens her journal no matter how far away we are from each other.